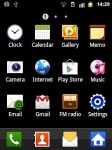
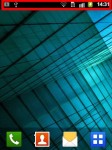
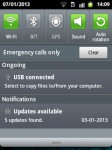
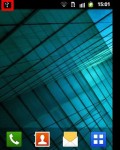
 These are instructions specifically for using Android devices to play GraphoLearn, based on the training done in the GraphoLearn diploma seminar in Lusaka on October 2012.
You can find more general Android instructions by Google for different Android versions at
http://support.google.com/android/?hl=en.
For instruction on how to use GraphoLearn on Android, see GraphoLearn Android Instructions.
Table of Contents
Android devices
Accessories
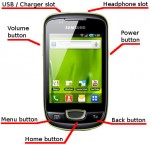
Samsung Galaxy Mini
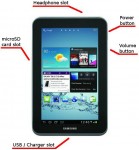
Samsung Galaxy Tab 2
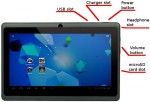
A13-MID tablet
Android basics
Screen
Physical buttons
Power button
Volume button
Touch gestures
Menu buttons
Home screen
App drawer
Creating shortcuts
Notifications
Settings
Internet connection
WiFi
Mobile internet
WiFi tethering
Copying files between devices
Connecting to PC with USB cable
Connecting Samsung Galaxy Mini to PC
Connecting Samsung Galaxy Tab 2 to PC
Connecting A13-MID to PC
USB troubleshooting
File Browser on device
External microSD card
External USB memory
Bluetooth
WiFi
Android devices
There are lots of different Android devices on the market, ranging from from small screen phones to 10 inch tablets. These instructions are mostly general to Android devices, though there are variations depending on the version of Android used on the device and possible customizations done by the manufacturer.
Where applicable, instructions are made specifically for Samsung Galaxy Mini phones, Samsung Galaxy Tab 2 tablets and the A13-MID tablets, since all of these are used with the GraphoLearn research projects. When referring to PC computers, the instructions assume a Windows operating system.
Accessories
Included with any Android device should be a charger for the device.
Phones usually use a regular Micro USB cable as both the charger cable and the connection cable. Sometimes the USB cable can be detached from the charger to use it as a regular USB cable. The devices can also be charged from a USB port on a computer.
Tablets often have different kinds of cables. The Samsung tablets use a wide, flat 30-pin USB cable and the A13-MID tablets have a separate power cord.
Samsung Galaxy Mini

- An Android smartphone by Samsung
- WiFi, Bluetooth, SIM card
- USB charger included.
- Regular Micro-USB cable can be used to connect to a PC or charge the phone.
- A microSD card is included and is used as app storage. It should not be removed from the device.
Samsung Galaxy Tab 2

- An Android tablet by Samsung
- WiFi, Bluetooth
- Detachable USB charger / cable included.
- The cable is a wide 30-pin USB cable, similar to iPhone.
- microSD card slot available, no SD card included
A13-MID tablet
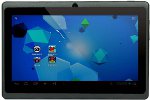
- A Chinese Android tablet
- WiFi
- Charger and Micro-USB cable included.
- Can also be charged using a Micro-USB cable, but it is not as effective.
- microSD card slot available, no SD card included
Android basics
This chapter deals with the basic usage of Android devices and the various buttons, gestures and apps you need to use with the device.
Screen
The most prominent feature and the main interaction method with the device is the touch screen. The screen is usually protected during storage with a plastic film, that should be removed. The screens are quite resistant to scratches when using them, but you should not store them for example in a pocket with keys.
The screen can be cleaned using a dry or slightly damp cloth, preferably a microfiber cloth like one would use to clean a laptop’s screen or eyeglasses. Avoid dirty or rough cloths and do not use detergents.
Physical buttons
On every device there’s at least two physical buttons, the power button and the volume button.
Power button
The power button is used to turn the device on/off and to turn the screen on/off.
To start the device, hold down the power button until the screen turns on.
When the device is on, a long press of the power button brings up the close menu, from which you can choose to shut the device down.
On the Samsung Galaxy Tab 2 tablets there are also additional options to turn on airplane mode, restart the device or mute/unmute the device through the shutdown menu.
When the device and screen is on, a short press of the power button turns off the screen.
When the device is on and the screen is off, a short press of the power button turns on the screen and brings up the lock screen.
In the lock screen you usually have to do a swipe gesture to unlock the device.
NOTE:If a device seems frozen for a long time and does not respond to touch gestures, you can shutdown/restart a device by holding the power button down for 10 seconds. If you can’t turn a device on, first try charging it for at least 10 minutes in case the battery has run out. If you have any other problems with a device, first try shutting it down and turning it back on and see if the problem persists.
Volume button
The volume button is used to control the volume on the device. On phones it controls the ringer volume by default. On tablets or when in an application that plays sounds on phones, it controls the media volume, which includes the sounds played by GraphoLearn.
Sound volume can also be changed from the Settings menu.
Touch gestures
The touch screen is the primary interaction method with devices and there are several types of gestures that can be used.
You can watch clarifying videos about the various touch gestures in Wikipedia.
http://en.wikipedia.org/wiki/Multi-touch#Multi-touch_gestures
Here’s a short list of the possible gestures, that may be referred to in this document.
- Tap / Touch / Press
- A short touch and release to the screen with your finger.
- Drag
- Touch an object on the screen and move your finger while touching the screen, then release.
- Scroll
- Touch anywhere on the view and drag you finger vertically or horizontally, depending on which way you want to scroll
- Flick / Swipe
- Touch anywhere on the view and quickly swipe your finger horizontally and release
- Long press
- Touch an object on the screen and hold your finger down until something happens
- Pinch
- Hold two fingers apart and touch the screen with them, then move them next to each other
- Spread
- Hold two fingers together and touch the screen with them, then move them away from each other
NOTE: You should always use the skin of your fingertip to touch the screen, fingernails do not work with capacitative touch screen.
Menu buttons
The home button may be a software button on the bottom of the screen or a physical button, usually located at the bottom center of the device. Pressing the home button takes you back to the home screen. Long pressing the home button brings up the task manager, where you see a list of active applications and can switch between them or close them.
The back button may be a software button on the bottom of the screen or a physical button on the device. Pressing it is used to return to previous screen or exit applications.
The menu button may be a software button on the bottom of the screen or a physical button on the device. Pressing the menu button brings up an application specific settings menu. The menu button may not be visible if there are no available menu options for the current app.
The active apps button can be used to switch between currently running apps. On devices with physical menu button it is accessed by long pressing the menu button.
Home screen
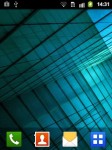
The home screen is the default view on Android devices. You can create shortcuts to the home screen to easily start your favourite apps. You can also add widgets to the home screen, for example weather or calendar widgets. You can swipe left or right to switch between several home screens, each with their own shortcuts.
On phones you have shortcuts to the caller app, contacts, messages and the app drawer on the bottom of the home screen.
App Drawer
The app drawer icon takes you to the list of available applications. The icon is located on the top right corner on tablets and the on the bottom on phones. You can swipe left or right to change pages in the app drawer. Tapping an app’s icon starts the app.
On Android 4.0 and newer you also change to the Widgets tab to see the list of available widgets that you can add to the home screen.
Creating shortcuts
To create a shortcut for an application, locate the app in the App Drawer, then hold your finger down on the app icon. After a moment, you will see the home screen, where you can drag the icon to a free position to create the shortcut. Drag the icon on either side of the screen to switch to the next or previous home screen.
Notifications
The notification area is located on the bottom right corner on tablets and on the top left corner on phones. In this area, you may see various notification regarding the device status, for example the USB connection icon or unread email. Touching the notification area on tablets opens the notification menu, from where you can clear notifications or tap them to interact with the app that gave the notification. On phones the notification menu is opened by dragging down the top of the screen.
Settings
You may also want to change the screen timeout in Settings -> Display to for example 2 minutes, so the screen does not turn off every time you don’t touch it for a moment. You can also disable the auto-rotation of the screen in the display settings.
Internet connection
Depending on the device, there may be several different methods for internet connection.
WiFi
WiFi connection is supported by all Android devices. You can toggle WiFi connection on/off from the notification menu or from the Wireless & Networks menu in settings. In the Wireless & Settings menu you can access the WiFi sub-menu to see a list of available WiFi networks. Connect to a wireless network by touching it.
Mobile internet
Using a mobile internet connection requires SIM card support from the device and a SIM card with a data plan from the operator. You can enable or disable mobile data usage from the notification menu or the Wireless & Networks menu in settings.
WiFi tethering
If you have a device with WiFi and a mobile data connection, it is often possible to share the mobile connection through WiFi, effectively changing the device into a mobile WiFi hotspot. This may help in situations, where you need internet access on a tablet that only has WiFi support but there’s no WiFi hotspot available. Look for settings called WiFi tethering or WiFi hotspot to enable this.
Copying files between devices
There are various ways to copy files either between an Android device and a PC or between Android devices. This chapter deals with the most common methods.
Connecting to PC with USB cable
Perhaps the easiest way to connect an Android device with a PC computer is via a USB cable. If the device is not automatically detected by the PC, you may need to download drivers from Windows Update or from the device manufacturer’s site.
With Samsung devices you will need at least Windows XP SP2 and possibly an internet connection so that the PC can fetch drivers from Windows Update. If the PC fails to recognize the Samsung device, you may need to download and install the Samsung Kies software from the Samsung web site at http://www.samsung.com/kies/ .
Connecting Samsung Galaxy Mini to PC with USB
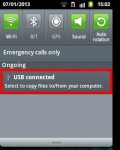
Connect the device to a PC with a USB cable and you should see a USB connected notification on the device.
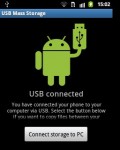
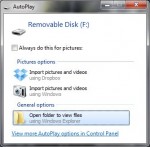
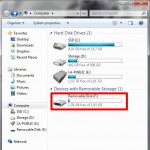
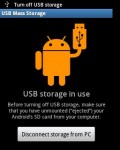
Pressing the Connect storage to PC button brings up a prompt, in which you should choose OK. The device is now mounted as a USB storage and you should see it under My Computer as a removable storage called GT-I9300. You may also get an AutoPlay prompt to browse the device. You can now copy files between the device and the PC.
Select Turn off USB storage from the device to end the connection securely, if you copied files to the device.
Connecting Samsung Galaxy Tab 2 to PC with USB
To connect a Samsung tablet with a PC, first make sure that the USB connection mode set to MTP in Settings -> Storage.
Connect the device to a PC with a USB cable and you should see a USB connected notification on the device. Touching the notification opens the notification menu, where you should see a Connected as a media device notification.
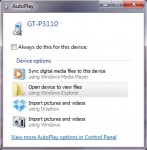
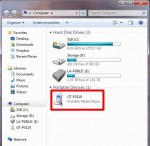
The device should appear as GT-P3110 under Portable Devices in My Computer and you may also get an AutoPlay prompt to browse the device. You can now copy files between the tablet and the PC.
Connecting A13-MID to PC with USB
There are no specific drivers to install for the A13-MID tablet. If the Windows version is not too old, the tablet should be recognized automatically in the USB storage mode.
Connect the device to a PC with a USB cable and you should see a USB connected notification on the device.
Open the notification menu by tapping the notification area. You should see USB connected notification in the list, with a description saying Select to copy files to/from your computer. If you do not see the option and there is a notification saying Connected as media device or Connected as camera and a description saying Touch for other options, select the notification to open a menu, where you can change to connection type to USB large storage, then detach and reconnect the USB cable.
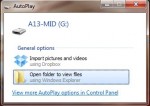
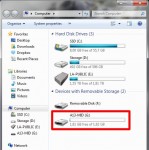
The device is now mounted as a USB storage and you should see it under My Computer as a removable storage called A13-MID. You may also get an AutoPlay prompt to browse the device. You can now copy files between the tablet and the PC.
In case of problems, please see the USB troubleshooting section.
USB troubleshooting
In case the device isn’t recognized by the PC, some of the following tips may help.
- Make sure the USB debugging option is off in Settings -> Developer options
- Try restarting both the device and the PC, then reconnect.
- Try a different USB port
- Try a different USB cable
- If nothing helps, try some other method to transfer files
File Browser on device
To access files on an Android device, you need to use a file browser app. Depending on the device, there may be a pre-installed app available. Samsung devices have an app called My Files, while the A13-MID tablets have an app called File Manager. It is also possible to install a file browser app from the Play Market, such as the free ES File Explorer.
External microSD card
Most Android devices support microSD memory cards. You can also use SD cards with a PC with a a card reader. To use a memory card with an Android device, insert the card in the slot on the device and the device should automatically recognize it. Be sure to go to Settings -> Storage and unmount the card before removing it if you copied file to the memory card, or you might risk losing or corrupting files.
External USB memory
Most new Android devices support USB On The Go (OTG), where you can connect a USB device straight to the Android device with a special USB OTG adapter. This allows you to use a USB memory stick to copy files to and from the device, just like with a microSD memory card.
Bluetooth
If the device has Bluetooth capability, it is also possible to pair the device with another device (PC, phone, tablet etc.) using Bluetooth. Instructions can be found at http://support.google.com/android/bin/answer.py?hl=en&answer=1650159.
Once a Bluetooth connection is established, you can send files by navigating to the with a file browser, long pressing on the file and selecting Send -> Bluetooth. Received files will be found in a folder called /bluetooth/.
WiFi
If you have WiFi access on the device and the PC has an internet connection, you can also transfer files by internet using for example Dropbox. When connected through a WiFi, you can also access shared folders on local networks using a file browser that supports it, for example ES File Explorer.
Installing third party apps
NOTE: You need go to the settings and turn on Unknown sources before trying to install GraphoLearn or any other app outside the Play Market. This enables installation of software from outside the Play Market and is necessary to install GraphoLearn. You can find the setting in Settings -> Security -> Unknown Sources.
First you need to copy the application package file (APK) to the device. You can either download it directly to the device using the internet browser or copy it from a PC or another device using any method.
Once you have the APK on the device, you need to locate it with a file browser. Touch the APK file to start the installation. If there is already a previous version off the application, you get a prompt asking you if you want to overwrite it. Choose OK and then again OK in the next prompt to accept the program’s permissions and install the app.
Google account and Play Store
To get the most out of an Android device, it should be used with a Google account. This allows access to the Play Store, where you can get free and paid apps for your device. Note that GraphoLearn is not currently distributed through the Play Store and a Google account is not necessary to play GraphoLearn.
If you already have a Google account, you can use it with any Android device. To add an account, go to Settings -> Accounts & sync and choose Add account in the top right corner and choose the type of account from the list. With a Google account you can then choose to create a new account or use an existing one.
NOTE: If the device is not restricted to personal use, you should not use your personal Google account, since that gives anyone using the tablet access to your Gmail account. If the device is shared and for example used by kids in a school, you can opt not to use a Google account on the device at all or create a new account that does not contain any personal data.
Once you have a Google account connected with the device, you can use the Play Store. There are lots of free apps that you can download and use for free. There are also paid apps that you need to purchase before using. For purchasing apps you need a credit card and a Google Wallet account.
